VIsual Studio 2015–Git Amend–Commit
By terje
This post is written for those going from TFS Version Control to Git, and is an introduction to a smart improvement in Visual Studio 2015 - Commit Amend. Command Line enthusiasts already know how this is done, but it may still be useful to see how this is resolved in Visual Studio.
In TFS VC the checkin command is used to add files to version control. The command saves the file to the central TFS VC system. When using Git you operate on your own local git repository first - by committing changes to the local and then you push these changes to the external remote repository.
You rarely do both of these operations one after another, you commit many more times than you push. Every time you have a small change that you feel is completed , you commit this. Since commit goes against the local repo, this is very efficient and fast. When a complete task is done, you push to the remote, and then all commits are transferred to the remote server. .
Commit Amend is a known command for the experienced Git user and easy to do using the command line. We will show how to do it from Visual Studio, as well as a few tricks - everything without using the command line!
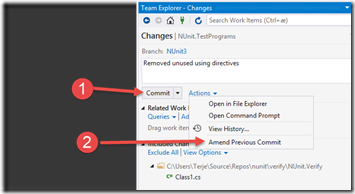
To find the Commit Amend, look under the Action in the Changes hub in Team Explorer.
Normally you only choose (1) Commit, but you can also choose this (2) Amend Previous Commit.
To see this in action, do a change in a solution and commit that, but don’t push it up. IN the example below the last change is just an added .gitignore file.
Then let us do another change, and go to the Changes to commit the change, but this time using the Amend Previous Change, add a new comment too. In our example we do a change in the Class1.cs file.
The history before the change may look look like this:
When we do a Amend Previous Commit, the new change is added to the last commit. The history after becomes.
Notice, we have the same number of commits, but it looks like the new commit overwrote the old one.
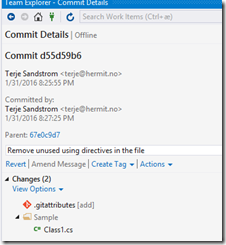
If we look at the content however,
Notice that both the .gitattributes and the Class1.cs is included, so it is obvious the first commit has been expanded with the new one. Also notice that the SHA-key has changed, so there is in fact a complete new commit. If we use tool like GitViz this is even easier to see:
What happened was that the earlier commit is still there (1), but a new commit with both changes was added, and the HEAD and master now points to the new one (2). So the history view from VIsual Studio is correct, it shows the history from master/head and backwards. In Git terms this is what is called “the history has been rewritten” (and there are more commands that can do this)
(The commit that was “overwritten” , 356fe85 in the image above – will only be there for a while, we say it is dangling, and after a while the git garbage collection will remove it. )
So Amend Previous Commit is a perfect way to add files you have forgotten in an earlier commit. However, be aware of two things here:
TRAPS
1) You can ONLY amend the last commit you did.
- You cannot amend a commit that has been pushed to the remote.
This second trap is an important principle. As long as you work within your local repository, there is a lot of things you can do, like the Amend Commit, but once you have pushed it remote, then also others can work with it, and subsequent changes to the history after that can be very annoying. When using Amend Commit in Visual Studio this is not even allowed.
TRICK: Keep a comment or change it
Sometimes is it ok to add or change files and at the same time change the comment, but often one want to do only one of these. If one has written a long comment, and have just forgotten to add a file, it is annoying to write that comment again. Here is a little trick that fixes that:
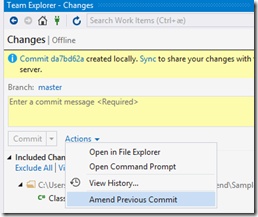
Let us do a new small change, and select Amend Previous Commit again:
This time just don’t write anything in the comment field, ignore it saying “Enter a commit message <Required> “ , and as you can see the Amend Previous Commit is not dimmed, the Commit is on the other hand dimmed – because it is not allowed to commit without comments. But we are amending, and when that is done, we can see from the history that the file was added and the original comment is still there, and all with a new SHA-key:
Changing comment only
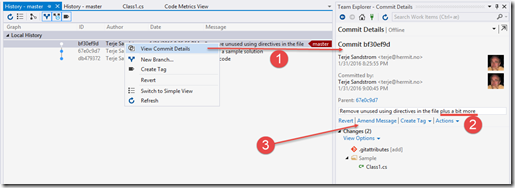
Other times it is not new files one need to add, but the comment that needs to be changed. This is also doable, and can be changed using Commit Amend, but in this case you must do it starting from the History view (1 in image below) . In the Commit Details pane, you can change the comments (2) and then the Amend Message (3) lights up.
If you refresh the history view (1 below), you will see that the comment (2) has been changed.
Notice that this also resulted in a new commit (see the changed SHA-key).
Usages
Amend Commit is of course nice to have when you need to change something, and very often it is the comment that needs to be changed. One thing one often forget is to add the related work item. One easy way to do this is to Amend the message, adding the work item number as #12345 (#work item number), to the comment, and TFS will automatically connect the commit and the work item.
If you have forgotten some files, it is of course easy to just commit again, but you then have to add a new comment. Using Amend Commit is just as fast, and you don’t need to write that comment again, or even adding a meaningless “asd” comment. Just beware that this not be misused, by just adding new stuff to the same commit all the time. Use with care!
It is also a point that your history will be a bit cleaner, with less cluttered up extra commits for each small thing you forgot. That is not so bad either, and you might not need to think about things like squash commits, keep it clean from the beginning – using Amend Previous Commit.
Code on! Commit often!
(A Norwegian version of this can be found here.)


