How to resolve cases of Visual Studio “No tests appearing”
By terje
The Visual Studio Test Explorer can be a bit picky about showing tests. There are multiple reasons for why they don’t always show up when you expect them to do, and most of the cases are PEBKAC type of issues. That doesn’t mean it is easy, there are just becoming too many variations, and Visual Studio does not tell you what is really wrong.
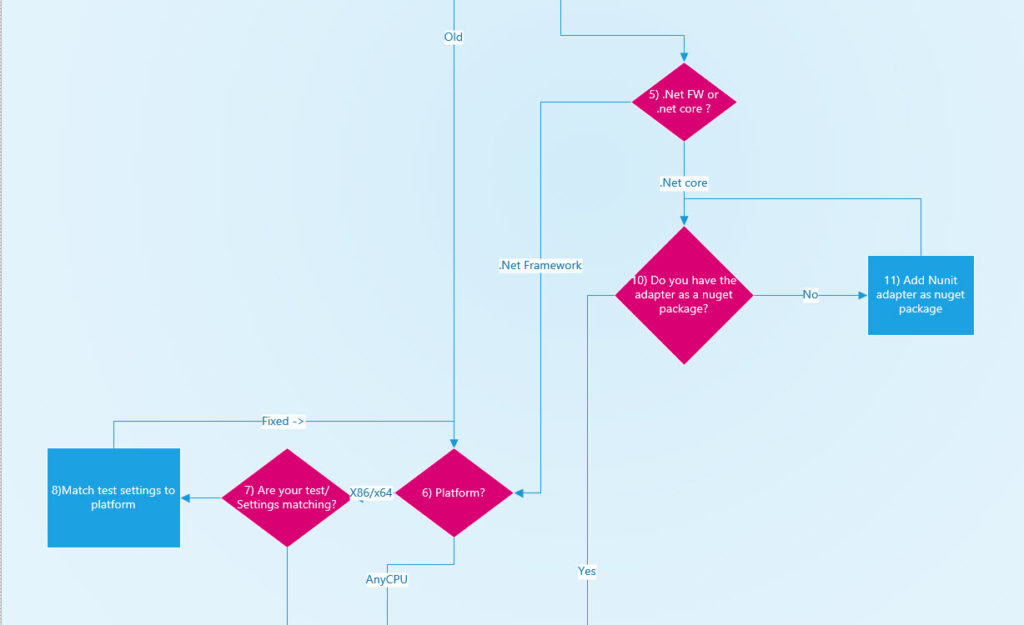
The different variations of targets and adapters doesn’t make this easier. To help in diagnosing this, I have created the diagnostic flow chart shown below. Further below you will find the comments for each block and how to rectify the issues, if you don’t already know. The flowchart is mostly general, although I use NUnit as the default adapter in the examples.
Also note that for many of the steps below, you might need to restart Visual Studio. When, what and which version of VS require it is still unclear.
User setup issues:
0) First of all, you need to have an adapter installed. Visual Studio only comes with the old MSTest 1 adapter installed. If you want to have any other adapter, either for MSTest, NUnit or XUnit, you must install them.
There are two types of installers, VSIX and Nuget. MSTest 2 and XUnit only exists as Nuget adapters, NUnit still have a VSIX adapter too.
The recommendation is to go for Nuget based adapters, which then follow your solution. This means your CI builds will work with unit tests “as is”. You do have to include them in at least one project in your solution.
1) Visual Studio 2017 introduces a new project system and thus a new project format. The new format is originally based on the project.json format, now changed to be in the standard xml used in the csproj files, but with a reduced set of required settings, making it much simpler.
Anyway, if you use the new format, there are a couple of additional things you need to have done:
2,3) You must include the Test Sdk. Also, the test frame work and the adapter should be included. Ensure the following section is included, given NUnit as the selected framework:
<ItemGroup>
 <PackageReference Include="Microsoft.NET.Test.Sdk" Version="15.5.0" />
 <PackageReference Include="NUnit" Version="3.9.0" />
 <PackageReference Include="NUnit3TestAdapter" Version="3.9.0" />
 </ItemGroup>
4,5) The new format includes support for .Net Core and .Net Standard. You can’t run tests using .Net Standard as the project type for your test assembly. You can test .net standard code, using either .Net core or .Net framework. So ensure that your target is set appropriately, either:
<PropertyGroup>
 <TargetFramework>netcoreapp2.0</TargetFramework>
 </PropertyGroup>
or
<PropertyGroup>
 <TargetFramework>net461</TargetFramework>
 </PropertyGroup>
You can select both .net core 1 or 2, and any valid .net framework version.
For a list of target framework monikers, see https://docs.microsoft.com/en-us/dotnet/standard/frameworks
A fully working setup for .net core can be found here.
10,11) If you do have a vsix adapter installed, and you’re not targeting .net core, you don’t need to include the adapter in the csproj file. BUT – if you do target .net core, you must include the nuget adapter regardless of whether you have the vsix installed or not. .Net core test projects do not work with vsix.
6-8) If you’re running under the .net framework target, and you run specific x86 or x64, that is not AnyCPU, then you must ensure that the test settings for the test runner is set to the same as the platform you have specified.
For details on how to do this, see this blogpost.
Note 1: Most of the issues come from using x64, as the deafault is x86
Note 2: Using a runsettings file can be smart, as that makes it easier to make it work on your CI server. You can install runsettings templates from here.
Crash fixing
All the above settings are user setup issues. If you’re still having issues, something in your system is not working properly, and preventing you from seeing your tests. If you have arrived here, and it still doesn’t work, there is one thing that you can try before you start diagnosing your system.
Visual Studio maintain a cache of the text explorer extensions it is using. This cache can in some cases go corrupt, so that Visual Studio believes it is ok – but it really isn’t, and it breaks on you, and unfortunately it does so silently, that is by not showing any tests.
The resolution to this was found by Loren Halvorsen, and is documented in this issue at the NUnit adapter Github site.
Since it is just a cache, you can just delete it, it will rebuild itself. Note that you need to close down all instances of Visual Studio, and in particular the vstest executables.
You can also use the IFix version 2 tool to do both the check and the actual fix on this.
What next?
If you’re tests are still not showing up, and you have restarted all you can, then you start doing diagnostics first. An upcoming blog post will detail a procedure for how to do this.
One good tip here is to determine if it is solution bound or machine bound. Does it work on your machine with a simple test solution? Does your solution work on another machine?
And, also check if it is bound to Visual Studio itself, or to the underlying tools. Does it work if you run it from the commandline with vstest.console?
And, does it work if you switch to another test framework? Have you tried MSTest 2 or XUnit ?
You can also raise an issue at the NUnit3TestAdapter github site, and include a short repro for your case.


